There are moments in life that leave an indelible mark on our souls, shaping our journeys in profound, often mysterious ways.
One such moment in my life was an unexpectedly beautiful encounter with the Churn Dash quilt pattern.
In the winter of 2019, I was preparing for my move from bustling New York to the tranquil countryside of Vermont. Packing away years of memories and nostalgia, I was caught in a whirlwind of emotions – excitement, anxiety, and a bit of melancholy.
Amid the organized chaos, I stumbled upon an old quilt, neatly folded, and tucked away in the forgotten corners of my grandmother’s cedar chest.
This quilt was unlike any I had seen before. It was a beautiful testament to a bygone era, etched with the delicate charm of the Churn Dash pattern.
As I traced my fingers over the intricate design, I couldn’t help but feel an overwhelming connection to its past. It felt like I had unearthed a piece of my family’s heritage, a silent witness to countless stories and shared warmth.
Grandma always had a special place for the Churn Dash pattern in her heart, reminiscing about the comforting rhythm it brought to her own mother’s long winter nights.
Seeing the pattern come alive in my hands, I felt a unique sense of connection, not just to the craft of quilting, but also to the lineage of strong women in my family.
So, come along as I share the magic of the Churn Dash quilt pattern, guiding you step by step to create your own piece of warmth and heritage.
The Charm of Churn Dash
Originating in the early 19th century, the Churn Dash pattern, also known as Hole in the Barn Door, is one of the oldest and most beloved quilt designs. Its simplicity and symmetry have a way of drawing you in, turning a seemingly ordinary quilt into a piece of art that warms both the body and the soul.
Materials Needed for Churn Dash
Gearing up for a quilting project is like preparing for an adventure. Here’s what you’ll need to embark on your Churn Dash journey:
- A cutting mat, rotary cutter, and quilting ruler
- Two contrasting fabrics (Fabric A for the background and Fabric B for the dash)
- Sewing machine
- Coordinating thread
- Pins and a pin cushion
- Iron and ironing board
- Quilting needle
Step-by-Step Instructions for Churn Dash
Step 1: Preparing Your Materials
Before diving into the crafting process, gather all the necessary materials and ensure your workspace is organized and comfortable. For the Churn Dash quilt, you’ll need a cutting mat, rotary cutter, quilting ruler, two contrasting fabrics (Fabric A for the background and Fabric B for the dash), a sewing machine, coordinating thread, pins and a pin cushion, an iron and ironing board, and a quilting needle.
Step 2: Cutting Your Fabric
The first step in making your Churn Dash quilt block involves cutting your fabrics. Here are the precise measurements you’ll need:
- From Fabric A, cut:
- Four 3-1/2″ x 3-1/2″ squares
- Four 2″ x 3-1/2″ rectangles
- From Fabric B, cut:
- One 5-1/2″ x 5-1/2″ square
- Four 2″ x 3-1/2″ rectangles
Remember, accurate cutting is vital for the final appearance of your quilt block.
Step 3: Organizing Your Fabric Pieces
Before you start sewing, it’s helpful to arrange your fabric pieces into the Churn Dash pattern. This visual guide will keep you on track as you assemble your quilt block.
Step 4: Creating the Half-Square Triangle (HST) Units
- Draw a diagonal line on the back of each 2-7/8″ square from Fabric B. This line will serve as a guide for sewing.
- Pair up a Fabric A square with a Fabric B square, ensuring their right sides are together.
- Sew along each side of the diagonal line, maintaining a 1/4″ distance. This forms a ‘V’ shape.
- Cut along the drawn line to create two separate HST units. Each unit is a small square made up of one triangle each from Fabric A and B.
- Press the seam allowance towards the darker fabric. This prevents the seam from showing through the lighter fabric. Repeat for all square pairs.
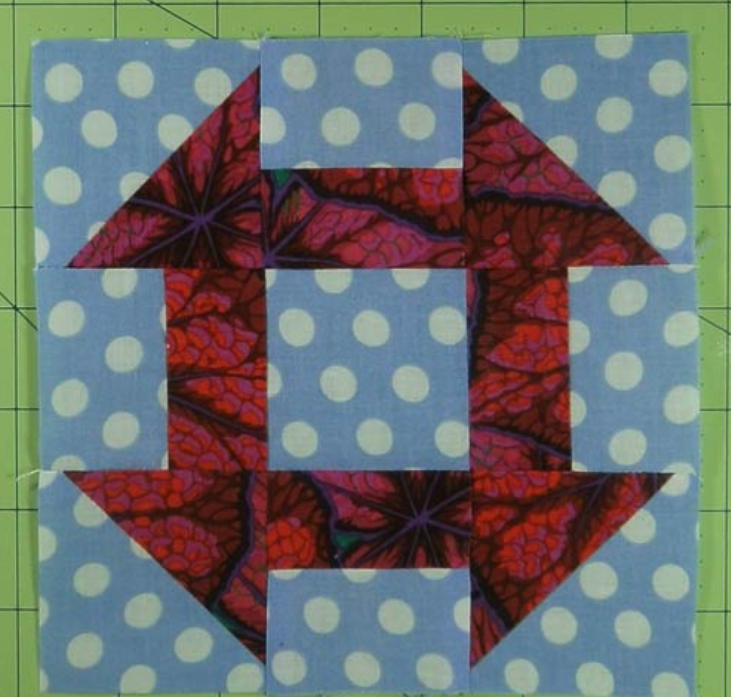
Step 5: Assembling the Churn Dash Block
- Lay out your squares and rectangles in three rows and three columns to form the Churn Dash pattern. The central 5-1/2″ square should be Fabric B, the four corners should be Fabric A, and the HST units should be placed so the Fabric B triangle forms a ‘C’ shape around the central square.
- Sew each row’s squares and rectangles together. Start by pinning the pieces together, then sew with a 1/4″ seam. Press the seams toward the darker fabric to maintain a neat appearance.
- After each row is assembled, sew the rows together to create the Churn Dash block. Keep the 1/4″ seam allowance and press seams towards the darker fabric.
Step 6: Pressing the Completed Block
Press the completed Churn Dash block to ensure it lays flat. This makes it easier to attach to other quilt blocks and gives your quilt a polished, professional look.
Step 7: Creating More Blocks
Repeat Steps 4 to 6 until you have created the number of blocks needed for your desired quilt size.
Step 8: Assembling the Quilt
Arrange your completed Churn Dash blocks in the desired layout. Sew them together, row by row, using a 1/4″ seam allowance.
Step 9: Adding the Batting and Backing
Once your quilt top is complete, it’s time to add the batting and backing. Lay the backing fabric on a flat surface, wrong side up. Spread the batting evenly over the backing, then lay the quilt top, right side up, over the batting. Ensure all layers are smooth and flat.
Step 10: Quilting
You can quilt your Churn Dash quilt by machine or hand, following the pattern or creating your own unique design. Remember, the quilting stitches should secure the top, batting, and backing together.
Step 11: Binding the Quilt
The final step is to bind your quilt to neatly encase the raw edges. Cut strips of fabric for the binding, sew them together end-to-end, and attach them to the front of your quilt using a 1/4″ seam. Then, fold the binding over to the back of the quilt and hand-stitch it in place.
Full Pattern: Click Here
Crafting a Churn Dash quilt is not just about creating a cozy blanket; it’s about embracing a slice of history, a connection to our past. Every stitch you make breathes life into a tradition that spans centuries and generations. Each finished block is a testament to your love for quilting and a tribute to the craftswomen who paved the way.
So, let’s dive into the captivating world of the Churn Dash pattern. Whether you’re a seasoned quilter or a beginner looking for a meaningful project, the Churn Dash is a beautiful journey to embark on. It’s a reminder of the power of simplicity and the beauty of tradition. And who knows? Perhaps, like me, you’ll find a piece of your heritage sewn into its timeless design.
Happy Quilting!


