Warm greetings to all my fellow crafters! It’s Julie here, weaving yet another personal tale into the vibrant tapestry of quilting. As we navigate these unprecedented times, I’ve found solace and strength in the rhythmic dance of needle and thread.
SEE A NEW PATTERN HERE
My family and I have been a haven of health and hope, and I send wishes for the same serenity to envelop your home. Despite the upheaval, I’ve been embracing the whirlwind of creativity, channeling energy into the stunning art of Jane’s Binding Tool Star Quilt.
The Binding Tool Star Quilt: A Symbol of Unity
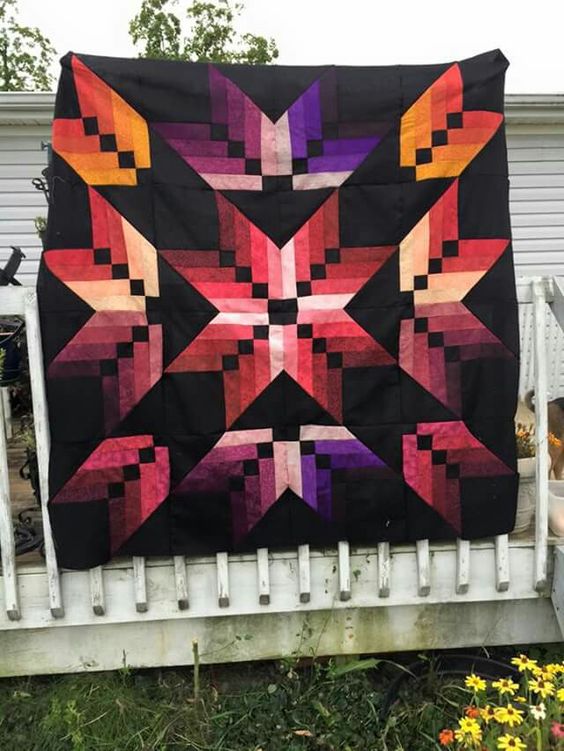
Today, I’m thrilled to share the Binding Tool Star Quilt, a pattern that has become a beacon of light during long days. This quilt, with its star-like radiance, mirrors the resilience we all carry within us. It’s a quilt that binds not just fabric but also the spirit of unity and perseverance that has been ever so crucial during these challenging times.
A Canopy of Colors
Jane’s Binding Tool Star Quilt is a canvas waiting for your unique brushstrokes. With each fold and stitch, it becomes a reflection of your personal journey. Whether it graces your wall as a testament to your creativity or serves as a comforting presence in your sewing room, this quilt is a true work of art.
SEE A NEW PATTERN HERE
Crafting Jane’s Masterpiece
The creation of Jane’s Binding Tool Star Quilt is an odyssey of colors and patterns. A fusion of reds and purples can conjure up a sunset’s glow, while a blend of oranges and blues might echo a sunrise’s hope. The process is a joyous exploration of hue and texture, inviting you to curate a palette that sings to your soul.
Preparing to Quilt
Before diving into the stitching, take a moment to prepare your fabrics with care. Washing them with a gentle detergent and ironing each piece lays the groundwork for a flawless crafting experience. It’s the first stitch in a series of steps that culminates in the creation of something extraordinary.
Step-by-Step Guide to Jane’s Binding Tool Star Quilt
- Inspiration and Selection: Begin by drawing inspiration from the world around you or the colors that resonate with your emotions. Select a range of fabrics that complement each other, with a combination of shades and patterns that bring out the essence of the Binding Tool Star pattern. For a vibrant effect, consider a mix of bold reds and purples or for a more subtle approach, explore the serenity of blues and greens.
- Fabric Preparation: Wash all your chosen fabrics with a mild detergent to prevent any color bleeding or shrinkage after your quilt is completed. Once dry, iron each piece to ensure a smooth and wrinkle-free surface which will make cutting and piecing much easier.
- Measuring and Cutting: Use the Binding Tool as a guide to measure and cut your fabric into precise strips and squares. This tool is designed to help create perfect angles and lengths for the star pattern. Accuracy here is crucial for the stars to align correctly in the final assembly.
- Piecing the Star: Begin constructing the star by piecing together the center. This will form the heart of your quilt. The precise arrangement of these initial pieces sets the tone for the rest of your project.
- Adding the Binding Tool Angles: With your Binding Tool at hand, start creating the distinctive angles that give this quilt its name. Cut and piece your fabric according to the tool’s instructions, ensuring each angle is sharp and each line is straight.
- Assembling the Blocks: Assemble the quilt blocks by sewing the cut pieces around the central star, alternating between lights and darks to create depth and dimension. Pay close attention to the orientation of each piece to maintain the pattern’s flow.
- Quilt Top Assembly: Once all the blocks are pieced, lay them out to form the full quilt top. This step may require rearrangement to get the perfect gradation of color and contrast. Sew the blocks together, pressing seams as recommended to ensure a flat quilt top.
- Adding the Backing and Quilting: Choose a backing fabric that complements the front, and create a quilt sandwich with your batting in between. Quilt as desired, following the lines of the star for a cohesive look, or get creative with free-motion quilting to add your personal touch.
- Finishing Touches: Trim any excess batting and backing, and prepare your binding. Attach the binding to the quilt, mitering the corners for a professional finish. Lastly, add a label to commemorate your work, and give your quilt one final press before displaying it proudly.
Full Pattern: Click Here
As we fold and stitch our way through the Binding Tool Star Quilt, we’re not just making a quilt; we’re charting a course through the stars, navigating by the light of our creativity. Below, you’ll find a video tutorial that shines a spotlight on Jane’s Binding Tool Star Quilt. This comprehensive guide is your compass to creating a quilt that’s as functional as it is beautiful, as meaningful as it is mesmerizing.
Stay tuned as I unravel the step-by-step process, stitch by vibrant stitch. Until we meet again, let’s keep our quilting community stitched together tightly, sharing our stories and our art. Remember, through every loop and pull, we’re crafting more than quilts—we’re crafting joy.
Happy quilting, everyone—may your stitches be strong and your fabric ever colorful!


