Welcome, fellow fabric enthusiasts! I’m Julie, and I’m absolutely delighted to unfold the story of the Strip Tango Baby Quilt with you today.
This pattern holds a special place in my heart, reminiscent of the warm spring day when I first laid eyes on its captivating design. Surrounded by the gentle coos and giggles of my friend’s newborn, I was inspired to create something that was more than just a blanket—a symbol of nurture and affection.
The Strip Tango Baby Quilt quickly became my go-to for thoughtful gifts and cozy nursery additions. Its simplicity, paired with the freedom to experiment with colors and textures, makes it a favorite among quilters of every skill level.
Join me as I share the steps to craft this endearing quilt that, much like the little ones it’s made for, is filled with potential and joy.
The Pattern Dance
The beauty of the Strip Tango Baby Quilt lies in its simplicity and the playful dance of patterns and colors. It’s a quilt that invites you to experiment, to mix and match, and to create a unique piece of art every time.
Let’s prepare to immerse ourselves in the harmony of fabrics and the rhythm of the strips that give this quilt its name.
A Symphony of Strip Tango Baby
In creating the Strip Tango Baby Quilt, you have the freedom to choose from a spectrum of fabrics. Whether you’re drawn to the soft pastels that whisper lullabies or the vibrant hues that celebrate new life, your fabric choices will set the tone for your quilt.
And with just nine fat quarters, you’ll weave a quilt that’s rich in variety and texture.
As we embark on this quilting journey, remember that the Strip Tango is as much about the process as it is about the end product. It’s about finding joy in the selection of each fat quarter, in the trimming of the strips, and in the unfolding layout that comes to life before your eyes.
Step-by-Step
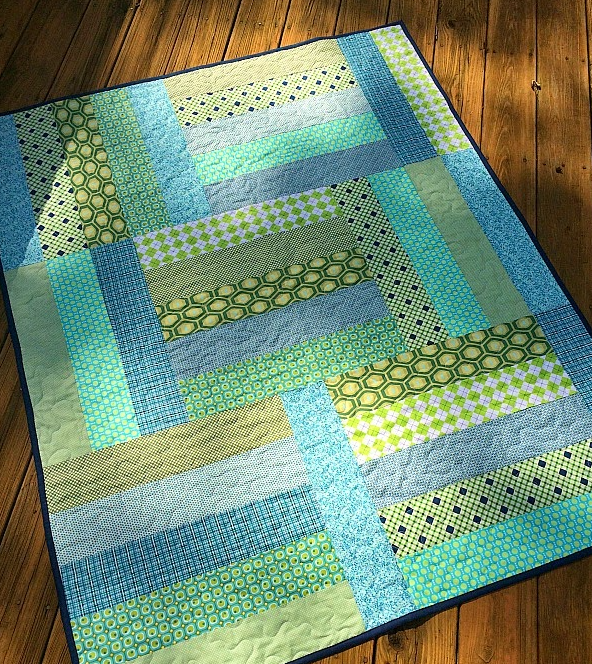
- Inspiration and Fabric Selection: Inspired by the quilt in the photo, choose a palette of cool blues and greens, mixing patterns and solids. Select enough fabric to create diversity in your strips—think about varying shades and prints for a dynamic look.
- Preparing the Fabric: Wash, dry, and press all fabric to prevent shrinkage and remove wrinkles. This step ensures your pieces will fit together perfectly as you sew.
- Cutting the Strips: Trim your fabrics to a uniform length, for example, 20.5 inches as a standard starting point. Then cut strips in varying widths—anywhere from 2.5 to 4.5 inches wide—to create interest in the quilt pattern.
- Arranging Your Layout: Lay out your strips on a flat surface or design wall. Play with the placement until you achieve a balanced asymmetry that mimics the flow of the reference quilt. Take a photo of your layout to refer back to during assembly.
- Sewing the Strips: Begin sewing your strips together in sections, using a consistent ¼ inch seam allowance. Press seams to one side to reduce bulk.
- Creating the Blocks: Once you have a few long strip sets sewn, cut them into blocks. For instance, if your strips are 20.5 inches long, you might cut blocks that are 20.5 inches square.
- Assembling the Quilt Top: Arrange your blocks in the desired pattern, rotating some to horizontal and others to vertical orientations to mimic the reference quilt’s design. Sew the blocks together to form rows, then sew the rows together, carefully pinning to match seams.
- Adding Borders (Optional): If you wish to frame your quilt, add a border using one or two solid fabrics that complement the quilt’s colors. This can help define the quilt’s structure and enhance the visual effect.
- Quilting: Create a “quilt sandwich” with your quilt top, batting, and backing fabric. Pin or baste layers together. Quilt as desired; you might echo the geometric pattern with straight line quilting or go for a contrasting pattern with free-motion quilting.
- Binding: Trim the excess batting and backing and square up your quilt. Cut strips for binding, sew them together end-to-end, and attach to the quilt’s front, mitering the corners for a clean finish. Fold the binding over to the back and hand stitch in place.
By following these steps, you’ll create a beautiful modern strip quilt that captures the essence of the reference image—a cozy, geometric piece that’s as much a joy to make as it is to behold. Enjoy the process and the lovely quilt you’ll bring into the world!
Full Pattern: Click Here
In the fabric-filled finale of our Strip Tango Baby Quilt, we’ve spun a tapestry that’s as functional as it is beautiful. This project, a harmonious blend of ease and artistry, embodies the joy of quilting—a joy that grows with every snip and seam. With the final strip set in place, our quilt emerges not just as a cozy embrace for a newborn but as a vibrant emblem of the love and care we infuse into our crafts.
As you hold the completed Strip Tango Baby Quilt, remember that each piece tells a story, each color sings a lullaby, and every quilt you create is a legacy of your creativity. May this quilt be a cherished companion, a keeper of memories, and a celebration of the little moments that make up the fabric of life.
Until our next creative encounter, may your threads be strong, your fabric be plentiful, and your quilting be happy!


