There is no denying the irresistible charm that a beautifully crafted quilt brings to a home.
Whether draped over a comfy couch, enhancing the décor of your bedroom, or warming your lap on a chilly evening, the quilt is a cherished possession.
Today, we will delve into creating a contemporary version of a classic quilt pattern—the Jellied Lone Star Quilt.
The ‘Lone Star’ design has long been a symbol of Texan pride, while the use of ‘jelly rolls’ adds a contemporary twist to this traditional quilt design.
Get ready to express your creativity as you stitch along with us!
About the Jellied Lone Star Quilt
The Jellied Lone Star Quilt is an inspired creation that combines tradition and modernity. This design was originally published by Terri Ann of ChildlikeFascination.com for Moda Bake Shop, and it brings a contemporary spin to the traditional Lone Star quilt design.
Utilizing the increasingly popular ‘jelly roll’, it’s an exciting way to immerse yourself in quilting.
Materials Needed
To bring this quilt to life, gather the following materials:
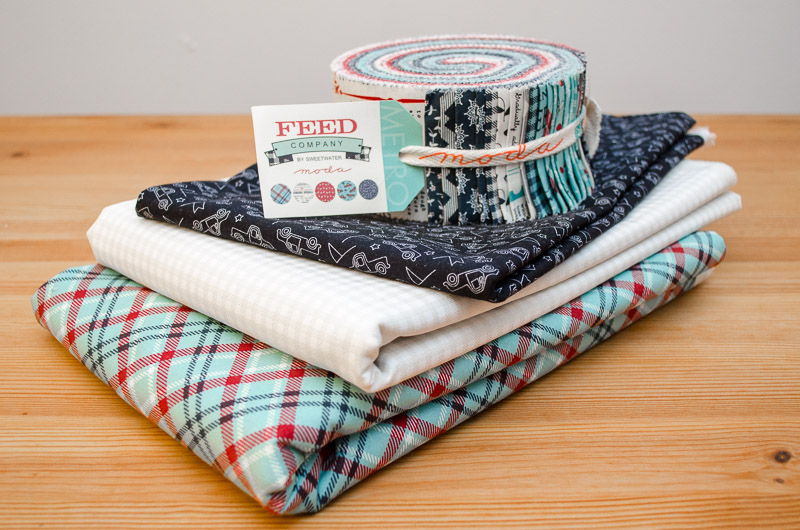
- 1 Jelly Roll of Feed Company by Sweetwater
- 3 yards Feed Company Vanilla (5575 14) for the background
- 1 yard Feed Company Black (5572 13) for binding
- 4 yards Feed Company Splash (5576 12) for backing
Tools:
- Ruler with 45-degree marking (a 24″ long ruler is helpful, but not required)
- Chalk pen or another marking pen
Detailed Instructions
Let’s now delve into the step-by-step tutorial for crafting this quilt. Remember, this may not necessarily be a quick project, but by patiently following these steps, you’ll end up with a stunning Lone Star quilt without wrestling with 200 tiny diamonds and no y-seams!
Part 1: Separation and Grouping
Your first step is to separate 25 jelly roll strips into the following colors:
- 5 red
- 4 black
- 5 dark blue
- 5 light blue
- 3 red with white
- 3 white
Afterward, you should group these strips into five groups as follows:
- Group 1: Red, white, light blue, red, dark blue
- Group 2: White, white, blue, white with red, black
- Group 3: Light blue, light blue, light blue, red, dark blue
- Group 4: Red, white with red, red, white with red, black
- Group 5: Dark blue, black, dark blue, black, dark blue
It is highly recommended to starch the jelly roll strips before starting.
Part 2: Strip Piecing
Now, you will piece the groups together, offsetting the ends approximately 2″. Remember to keep the same selvage on the starting end, as it makes the pattern much easier to complete. Here is the detailed process:
- Take the first color in the group and lay it right side up.
- Lay the next color in order on top, right sides together, offset 2″ to the right.
- Sew a 1/4″ seam along the top edge, then set the seam and press the seam allowance open.
- Repeat this process with each strip in the group, going in the order listed above.
- Repeat this process with all other groups.
Part 3: Cutting Strips
Once you’ve completed strip piecing, it’s time to cut 8 strips at a 45-degree angle from each pieced group. Here’s how you do it:
- Lay your pieced strips sideways on your cutting mat, align the 45-degree mark on your ruler with one of your seams.
- Trim off the selvage at a 45-degree angle, then flip the strip and cut a 2.5″ strip from the clean edge.
- Cut 7 more (a total of 8) of these diagonal strips from this piece.
Repeat this process with all other groups.
Part 4: Piecing Diamond Strips
Next, you’ll use one strip from each group to piece the diamond strips into 8 identical diamond points of the star.
- Start by laying down a strip from Group 1 and placing a strip from Group 2 above it, offset to match seam direction.
- Flip the top strip and mark 1/4″ from the edge, then align the strips right side together using the top of the 1/4″ mark.
- Sew a scant 1/4″ seam allowance across the top edge and check that your seams and points matched up.
- Continue adding strips until all 5 strips are sewn together in a diamond.
- Repeat until you have 8 identical diamond points.
Part 5: Attaching Triangles
To avoid having to sew y-seams, attach two triangles (one small and one large) to each diamond. You should end up with 4 units facing in one direction and 4 in the opposite direction.
Part 6: Finishing the Star
Now, it’s time to finish the star. Pair up a point block from each direction to create four square blocks. Use the pin trick as before to make sure your points match up. Sew these blocks together into two halves of the star, then join those halves to complete the star.
Part 7: Adding the Border
The final step is to add the border. Measure your star, then cut and sew border strips accordingly.
Full Pattern: Click Here
There you have it—a gorgeous, finished Jellied Lone Star Quilt! Remember to baste, quilt, bind, and take a moment to admire your beautiful work.
Quilting is a process, and every stitch you make represents a step in your creative journey. It’s essential to remember that practice is the path to perfection in quilting. So keep quilting, keep creating, and remember—the only quilt you’ll ever regret is the one you didn’t make. Happy quilting!


