Hello, fellow quilters! I hope you’re all having a wonderful day. Today, I want to share a story about a project that has brought a lot of positivity into my life. It was during the summer of 2020, a year that was, let’s just say, a bit unusual.
I was looking for a way to focus on the positive, to find a silver lining in the midst of all the chaos. And that’s when I stumbled upon the idea of creating a quilt that would serve as a reminder of the good things in life. Thus, the Positively Plus Mini Quilt was born.
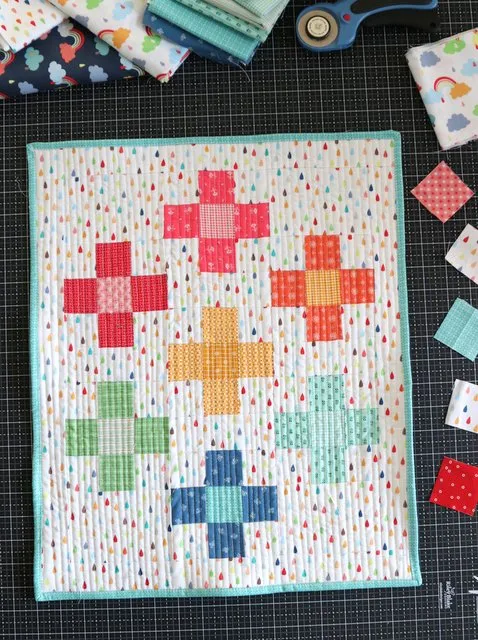
The Positively Plus Mini Quilt
This 16″ x 19″ mini quilt is a fun, fast finish consisting of nine-patch quilt blocks. The background fabric for this quilt is a raindrop print from a Noah’s Ark collection by Shawn Wallace for Riley Blake. I liked the symbolism of the positive plus vibes coming through the rain.
Materials Needed
- Background Fabric: ½ yard
- Nine Patch Blocks: Assorted scraps or 5″ squares
- Backing: 1 Fat Quarter
- Binding: ⅛ yard
Cutting Instructions
- Background Fabric: Cut 4 rectangles 5″ x 3.5″ and 4 rectangles 5″ x 2″. Cut 2 strips 2″ x WOF – sub cut 28 squares 2″ x 2″.
- Assorted Prints for 7 Nine-Patch Blocks: For each block cut 4 squares 2″ x 2″ and 1 contrast square 2″ x 2″.
- Binding fabric: Cut 2 strips 2″ x WOF.
Block Assembly
- Using 4 background 2″ x 2″ squares, 4 print 2″ x 2″ squares and 1 contrast 2″ x 2″ squares make 7 Nine-Patch quilt blocks. Sew rows of three 2″ squares as shown, pressing seams toward the main print squares.
- Sew three rows together, pressing seams away from center row. Repeat process to make 7 Nine-Patch quilt blocks.
- Use photo above to layout quilt into three vertical rows, starting with the 3.5″ x 5″ rectangles in four corners and alternating 2″ x 5″ rectangles between Nine-Patch quilt blocks.
- Sew Nine-Patch blocks and alternating rectangles together into 3 vertical rows. Press seams away from the Nine-Patch quilt blocks.
- Sew vertical rows together as shown. Press seams away from center row.
- Add 1.75″ x 17″ border strips sides and 16.5″ x 1.75″ border strips to top and bottom. Press seams toward border strips.
- Layer top, batting and backing fabric and quilt as desired. I did simple vertical straight-line matchstick quilting as I liked the way it emphasized the falling rain.
- Using 2 strips 2″ x WOF for quilt binding.
The Positively Plus Crib Quilt
As I was making this mini quilt, the thought struck me how easy it would be to blow up this exact same quilt design, using bigger squares, to make a crib-size variation. So I did! Here are the instructions for a crib-size 40.5″ x 49.5″ Positively Quilt!
Materials Needed
- Background Fabric: 1 ¼ yard
- Nine Patch Blocks: 7 assorted 10″ x 10″ squares + 7 assorted 5″ x 5″ contrast squares
- Binding: ½ yard
- Backing: 1 ½ yards
Cutting Instructions
- Background Fabric: Cut 4 rectangles 14″ x 9.5″ and 4 rectangles 14″ x 5″. Cut 28 squares 5″ x 5″.
- Assorted Prints for 7 Nine-Patch Blocks: For each block cut 4 squares 5″ x 5″ and 1 contrast square 5″ x 5″.
- Binding fabric: Cut 5 strips 2 ½” x Width of Fabric.
Crib Quilt Assembly
- Using 4 background 5″ x 5″ squares, 4 print 5″ x 5″ squares and 1 contrast 5″ x 5″ squares make 7 Nine-Patch quilt blocks. Sew rows of three 5″ squares as shown, pressing seams toward the main print squares.
- Use the same layout and method as mini quilt above (minus the border strips).
- Layer with batting and backing, baste, quilt, and bind.
Full Pattern: Click Here
Creating these quilts was a wonderful experience for me. It was a reminder that even in the midst of chaos, we can always find positivity. I hope that this free quilt pattern brings you as much joy as it has brought me. Happy quilting!


