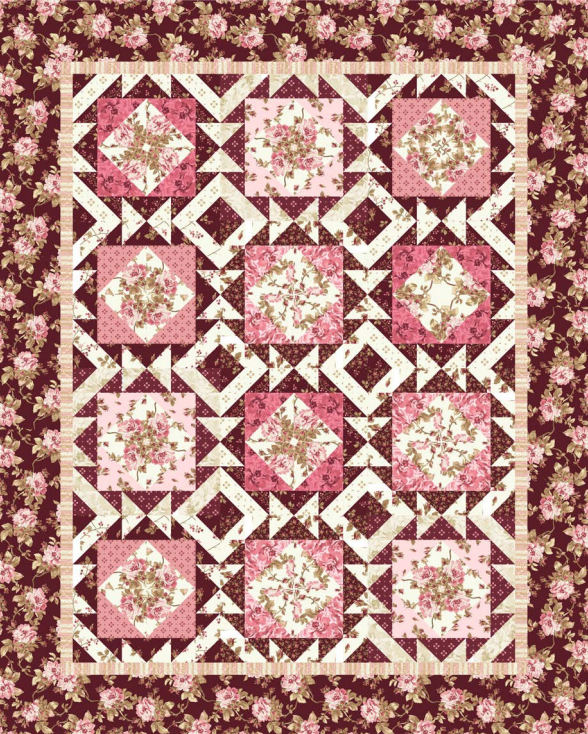
Embrace the art of quilting with the Burgundy and Blush Quilt, a pattern that marries the warmth of burgundy tones with the soft elegance of blush hues.
This 50″ x 62″ quilt, designed by Monique Jacobs, is an intermediate-level project that promises both a challenging and rewarding quilting experience.
In this guide, we will take you through the detailed steps of creating your own Burgundy and Blush Quilt, from selecting fabrics to the final stitch, ensuring each phase is enjoyable and fulfilling.
Gathering the Essentials for Your Burgundy and Blush Quilt
The journey of creating the Burgundy and Blush Quilt begins with assembling all the necessary materials. This quilt requires a thoughtful selection of burgundy and blush fabrics, each bringing its unique texture and shade to contribute to the quilt’s overall harmony.
Alongside these, you’ll need batting, backing fabric, and essential quilting tools like a reliable sewing machine, sharp cutting tools, a clear quilting ruler, and an assortment of pins.
This section will provide a detailed list of materials and offer insights into preparing your workspace for an efficient and enjoyable quilting process.
Selecting Fabrics with a Designer’s Eye
The choice of fabrics plays a pivotal role in the beauty of the Burgundy and Blush Quilt. This section will guide you through the process of selecting fabrics that not only meet the pattern requirements but also resonate with your personal aesthetic.
We’ll delve into the nuances of choosing the right combination of burgundy and blush tones, ensuring that each fabric complements the others while adding depth and interest to the quilt. Tips on balancing color intensity and print scale will be provided, helping you curate a palette that brings the quilt to life.
Precision in Cutting and Arrangement
Achieving the desired effect of the Burgundy and Blush Quilt heavily relies on precise cutting and thoughtful arrangement of your fabric pieces. In this section, we’ll cover the essentials of accurate fabric cutting, emphasizing the importance of following the pattern’s measurements closely.
We’ll also provide strategies for arranging your cut pieces, offering advice on how to lay them out in a way that showcases the interplay of colors and patterns, setting the foundation for a stunning quilt top.
Piecing Together Your Vision
Piecing is where your quilt starts to come alive, transforming individual fabric pieces into a cohesive whole. This part of the guide will offer step-by-step instructions on piecing the Burgundy and Blush Quilt.
We’ll discuss techniques for aligning edges, achieving uniform seam allowances, and ensuring that each block aligns perfectly with the next. Tips for pressing seams and maintaining the quilt’s overall flatness will be shared, helping you craft a quilt top that is as beautiful as it is precise.
Quilting and Binding: The Final Stages
Once your quilt top is pieced, the next steps are quilting and binding, which add both durability and a finished look to your project. This section will guide you through the process of choosing a quilting pattern that complements the Burgundy and Blush design, whether you prefer machine quilting or hand quilting.
We’ll also walk you through the binding process, offering tips for creating crisp, clean edges that frame your quilt beautifully. From selecting the right batting and backing to the final stitches of the binding, this part of the guide ensures your Burgundy and Blush Quilt is a masterpiece of craftsmanship.
Full Pattern: Click Here
Materials List for the Burgundy and Blush Quilt
- Burgundy and Blush Fabrics: A selection of fabrics in varying shades of burgundy and blush as outlined in the pattern.
- Backing Fabric: Fabric for the back of the quilt, ideally complementing the front design.
- Cotton Batting: Suitable size cotton batting for a soft, durable quilt.
- Sewing Machine: A reliable machine for piecing and quilting.
- Cutting Tools: A rotary cutter, cutting mat, and fabric scissors for precise cuts.
- Quilting Ruler and Measuring Tape: For accurate measurements.
- Thread: High-quality threads in colors that match or complement your fabrics.
- Pins and Needles: For pinning fabrics and hand sewing, if needed.
- Binding Fabric: Strips of fabric for binding the edges of the quilt.
Step-by-Step Guide for Crafting the Burgundy and Blush Quilt
- Fabric Preparation: Wash, dry, and iron your fabrics to prevent shrinkage and color bleeding.
- Measuring and Cutting: Accurately measure and cut the fabric pieces as per the quilt pattern.
- Layout Design: Arrange the cut pieces on a flat surface to finalize the quilt design layout.
- Piecing the Blocks: Sew the cut pieces together to form the quilt blocks, paying close attention to the pattern and color placement.
- Assembling the Quilt Top: Join the blocks to create the quilt top, ensuring alignment and consistency in seam allowances.
- Creating the Quilt Sandwich: Lay the backing fabric, place the batting on top, and add the quilt top. Secure the layers with pins or basting stitches.
- Quilting: Stitch through all three layers, following your chosen quilting design.
- Trimming and Squaring: After quilting, trim the edges and square up the quilt.
- Binding: Attach the binding to the edges of the quilt for a neat finish.
- Final Inspection: Check the quilt for any loose threads or uneven areas, making adjustments as needed.
- Quilt Care: Provide guidelines on caring for the finished quilt to ensure its longevity.
Completing the Burgundy and Blush Quilt marks not only the end of a creative project but also a testament to your skill and dedication to quilting. This journey from selecting the perfect shades of fabric to the final stitches of the binding encapsulates the joy and fulfillment of quilting.
The Burgundy and Blush Quilt, with its warm tones and elegant design, is a beautiful addition to any home, and a symbol of your quilting journey. As you reflect on this project, may it inspire you to take on future quilting adventures, continuing to explore the boundless possibilities of fabric and design.


